How to Log In to the WordPress Dashboard | A Complete Beginner's Guide
If you’ve just launched a WordPress site, your first question is probably: How do I access the WordPress dashboard?
In this article, we’ll walk you through the step-by-step process of logging into the WordPress admin panel in simple terms, and we’ll also share some important security tips with you.
What is the WordPress Dashboard?
The WordPress Dashboard is the administrative area of your website where you can create posts and pages, install themes and plugins, change site settings, and publish content.
Steps to Log In to the WordPress Dashboard
1. Add /wp-admin or /wp-login.php to the end of your domain name
To log in, simply enter one of the following URLs in your browser:
www.yoursite.com/wp-admin
Or www.yoursite.com/wp-login.php
Note: Replace yoursite.com with your own website’s domain name.
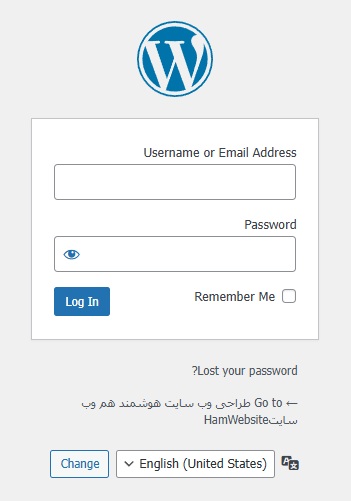
2. Enter your username and password
On the login page, enter your username (or the email you registered during WordPress installation) and your password, then click the “Log In” button.
3. Access the Dashboard
If you entered the correct information, you will be taken to the WordPress dashboard.
What to Do If You Forgot Your Password?
Click the “Lost your password?” option on the login page and enter your email address to receive a password reset link.
Security Tips for Logging into the Dashboard
Be sure to use a strong password.
Change your login URL using plugins like WPS Hide Login for added security.
For extra protection, enable two-factor authentication.
Conclusion
Logging into the WordPress dashboard is simple, but following security tips and knowing the correct steps will ensure smooth access to your site’s admin area. Now you’re ready to start creating pages, installing themes, and publishing your content!